This expands on Tutorial #2 where we added a playable character to our game and some random content.
INTRODUCTION
This time we will talk about adding two kinds of weapons to our playable character’s um…playability. You’ll have to excuse the crappy graphics. For me, building successful sprites takes the most time and effort out of all the skills required for programming. As a result, I just halfassed these to get my point across. If you want to, you can alter the program to include your own sprites. In #1 we talked about building sprites and tiles. However, it didn’t even cross my mind that using Tile Molestor would not be something that most people would know how to do. We’ll correct that oversight and cover it briefly here. But at the end of this write up we will have added a projectile type weapon and a sword type weapon to our character that will be activated using the A and B buttons.
TILE MOLESTOR
I do most of my actual graphics design in MS Paint. It is familiar and easy to use. After I get everything the way I want it and split it into tiles, only then do I input everything into Tile Molestor. So, let’s think about what we’ll need as far as sprites for our character.
1. We need a shooting pose for 4 directions. (We could technically make a different pose for projectile and sword, but the process is exactly the same and sloth wins out, so we are going to use the same sprites for both weapons.
2. We need a sword design. Keep in mind that the weapons design HAS TO MATE UP with the shooting pose from point 1. Also, with 4 directions, we’ll need two sprites. An up/down mirrored sprite as well as a left/right mirrored sprite.
3. We need a projectile design. See notes in point 2.
Following the procedure laid out in write up 1, we construct the following:
![]()
Armed with our sprites, we head over to Tile Molestor. Heh, molestor. You don’t need all this info for this write up, but we’ll need it later, so shut up and listen.
An NES pallette has 4 colors that can be applied to each pixel of each tile. This jives with the attributes that we input for tiles in that we get two bits with which to specify info. However, what you are specifying in the attributes is the sprite palette, not the pixel colors. To get into pixel colors, we have to go deeper. To specify the colors for each pixel, we need two bits per pixel (i.e. color 1,2,3,4 of our palette, or 00,01,10,11). Make sense so far?
Now, each tile is 8×8 pixels, or 64 total pixels. If we multiply this out, 2 bits per pixel X 64 total pixels = 128 bits or 16 Bytes per tile. When you click “NEW File” in Tile Molestor, this is the size it prompts you for. So, if you want a file with 6 tiles, you would put in 6 tiles X 16 Bytes/tile = 96; or 28 tiles X 16 Bytes/tile = 448. Easy as American Pie.
The defaults in TM are not set up for the NES. You need to change the Codec to the code that the NES needs. Go to View>Codec>2bpp planar, composite. This is demonstrated in the following pic:
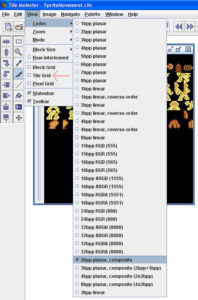
Now we should be set up to input NES graphics. However, it just gives you a blank, black block where you input your tiles. I like to select the “View Tile Grid” as shown in the above pic. This keeps you from offsetting your graphics by 1 pixel or something retarted.
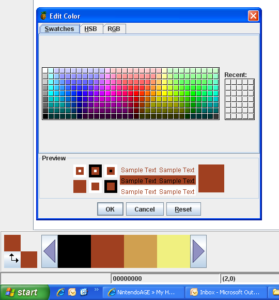
Next, you can use the default palette shown at the bottom, or if you like, to make it easier, you can specify your own. You can do one of two things. Either click on the arrow buttons on the sides of the palettes to use a standard one or double click on each color to specify your own palette as shown here:
Now, if someone would add a cut from paint paste into Tile Molestor, I would gladly impregnate them. But so far, I haven’t figured that one out. So, just go through pixel by pixel and transfer your stuff into the file. I like to do the outlines and then fill in the solid colors. Just try to keep your tiles easy to find and input into our sprite tables. The rest of the controls work more or less like paint, so just let me know if you have any other questions.
HANDLEING INPUT
First thing that we need to do is handle the input from the A and B buttons. To do this, we are going to try to keep it as simple as possible. All we are going to have the buttons do is set timers. That’s it. We want our routines to be seperate entities so that we can reuse them without having to dig around for code. So, we do this:
ReadA:
LDA joypad1_pressed ; player 1 – A
AND #%10000000 ; only look at bit 8
BEQ ReadADone
LDA Weapons_RAM+4 ;see if the arrow is ready to fire again
CMP #$FE
BNE ReadADone
LDA #Atimer ;reset the timer so that the arrow is fired next frame
STA A_timer
ReadADone: ; handling this button is done
;;;;;;;;;;;;;;;;;;;;;;;;;;;;;
ReadB:
LDA joypad1_pressed ; player 1 – B
AND #%01000000 ; only look at bit 7
BEQ ReadBDone
LDA B_timer ;check and see if the mace is still out
BNE ReadBDone
LDA #Btimer ;reset the timer if it was not pressed last time, but is this time
STA B_timer
ReadBDone: ;handling this button is done
All these routines do is input a number (in this case a constant declared in our constants file) into the timer. A checks to see if the arrow has hit something and has been reset before firing again and B checks to make sure that we don’t try to hammer something again before the previous ass kicking has finished. Note that from here on out I will assume that you know what I’m talking about with all the new variables and/or constants. It feels redundant restating them all.
When we input these constants into the timer, we need an independant way of counting down the timers. So, we put a simple routine in our GameState0 routine AFTER the PC updates but BEFORE the NPC updates. The order of operations is important here because if you put the weapons updates after the enemy updates, you’ll have a delay before they kick in and it could mean the difference between life and death. This way everything activates at the same time and your timing is right on. So, we add the following:
JSR update_enemy_sprites
~~~~~~~~~~~~~~~~~~~~~
JSR transfer_location_info
JSR arrow
arrow_dec:
LDA A_timer
BEQ .done
DEC A_timer
.done
JSR mace
mace_dec:
LDA B_timer
BEQ .done
DEC B_timer
.done
~~~~~~~~~~~~~~~~~~~~~
UpdateENEMIES:
Pretty simple right?
TRANSFER LOCATION INFO
Technically we don’t need this yet, but we are going to put it in here to save us from having to hunt down and change a bunch of variables later. You could use the “,x” indexing method for everything that this does, but with everything that we are going to use it for, it will save processor time and ROM space to use this quick transfer rouitine. All it does is loads the position info for the “dominate” sprite into new variables called “sprite_vertical” and “sprite_horizontal”. Now that we have these we can write ALL of the routines that we would normally loop all of our enemies/PC/etc. through relative to these variables. Just keeps it less confusing. (Note that I refer to “dominate sprite”. I keep everything the same, meaning that all meta sprites are referenced to the upper left hand corner of the top left sprite tile.)
transfer_location_info:
LDX enemy_number
LDA updateconstants,x
TAX
LDA sprite_RAM,x
STA sprite_vertical
LDA sprite_RAM+3,x
STA sprite_horizontal
RTS
Later we’ll add what amounts to the opposite of this routine. Collision detection will operate on the variables then at the end we will transfer the variables back to Sprite_RAM. In this write up, however, weapon positions are measured relative to “sprite_vertical” and “sprite_horizontal”.
BRANCH CARRY SET and BRANCH CARRY CLEAR COMMANDS
I don’t know if these are covered elsewhere, but we’ll need them A LOT here, so be sure you understand these.
Branch Carry Set or BCS:
For this instruction, you would use something like this:
LDA variable
CMP #$08
BCS .next
On the CMP function (or CPX or CPY), the carry flag is set when A is greater than or equal to the value placed in the CMP line, in this case, #$08. Or, if A is less than #$08, the flag will be cleared. So, BCS is telling the thing to:
-if variable is less than #$08, Carry is CLEAR, so do nothing
-if variable is equal to #$08, Carry is SET, so jump to .next
-if variable is greater than #$08, Carry is SET, so jump to .next
Branch Carry Clear or BCC:
This is basically the same as BCS, but branch when clear rather than set. So, we’d write:
LDA variable
CMP #$08
BCC .next
On the CMP function (or CPX or CPY), the carry flag is set when A is greater than or equal to the value placed in the CMP line, in this case, #$08. Or, if A is less than #$08, the flag will be cleared. So, BCC is telling the thing to:
-if variable is less than #$08, Carry is CLEAR, so jump to .next
-if variable is equal to #$08, Carry is SET, so do nothing
-if variable is greater than #$08, Carry is SET, so do nothing
Simple, easy, and powerful. Defenatly something you’ll want to add to your toolbox. There is also a BMI (Branch Minus) and BPL (Branch Plus), but I don’t use them that much, if ever, so I’ll leave that up to you to figure out.
ARROW ROUTINE
Now that we have everything set up, we can start working on our arrow routine. Strive on. Remember: control over the NES is won, not given.
Basically we need to impliment the following steps in our program:
1. Check and see if the arrow is inactive (i.e. sitting with #$FE for its vertical and horizontal position)
A. If it’s inactive
a. See if our A timer is equal to the value input by pressing A. Yes=load the starting position and graphics. No=RTS
b. If it is NOT equal the the #Atimer and NOT active, the arrow is not being used. Do nothing.
B. If it’s active.
a. Check which direction the arrow is moving and move it in that direction the value that we have specified for our #arrow_speed.
2. Check the arrow collision with the walls. (Just pick an arbatray position for the walls or our arrow will continue to loop around endlessly)
A. Reset if it hits a wall.
B. Do nothing. (We’ll add sprite collision here-ish later)
3. Is the A_timer is greater than or equal to zero?
A. We need to impliment our shiny new graphics that we just made for shooting poses.
B. The arrow is already away and we don’t need to do anything else.
Note: We will use a constant similar to “Sprite_RAM” for our weapons sprite. In this case, “Weapons_RAM”. Here, we use the sword weapon as Weapons_RAM+0,+1,+2,+3 and arrow as Weapons_RAM+4,+5,+6,+7.
Let’s assume that the arrow is inactive first. We push the A button resetting our A_timer. Our routine jumps to the loading of the arrow’s initial position. Note that there will be a similar routine for each of the 4 directions, but they are pretty much the same, so we’ll just go through the one here:
LDA enemy_direction ;load the direction that our character is facing/traveling
STA arrow_direction ;store this direction in the variable for use in when the arrow is traveling
CMP #$00 ;our value for UP
BNE .nexts ;if not facing UP, branch to the next direction
LDA #$1E ;load the tile for the up/down arrow
STA Weapons_RAM+5 ;store the tile in the appropriate place in RAM
LDA #%00000010 ;load the attributes for the arrow
STA Weapons_RAM+6 ;store in the appropriate place in RAM
LDA sprite_vertical ;load our dominate sprite’s vertical position
SEC
SBC #$08 ;here we are just making the arrow line up with our character
STA Weapons_RAM+4 ;store the apprpriate vertical position in RAM
LDA sprite_horizontal ;load the dominate sprite’s horizontal position
SEC
SBC #$01 ;here we are just making the arrow line up with our character
STA Weapons_RAM+7 ;store the apprpriate vertical position in RAM
JMP .graphics ;jump down to the graphics updates for our PC meta tile
This is a pretty simple routine. The only thing a little challenging is the position changes when specifying the initial arrow location. You could technically work this out on paper, but I’m lazy and like to just adjust it until it lines up. You know, hump it into submission and show it who’s the bitch.
Now that we have our loaded and fired, on the next frame it will need to travel. How do we do this, you ask, the same as we do our other automatic movement. Again, for up only, simply:
LDA arrow_direction ;load the arrow direction stored in the above routine
BNE .down ;moving in the up direction (note that up is direction #$00)
LDA Weapons_RAM+4 ;load the starting position
SEC
SBC #arrow_speed ;move up whatever constant we input for #arrow_speed
STA Weapons_RAM+4 ;store the ending position
JSR arrow_collision ;check collsision with the walls
JMP .loadarrow ;jump to the next point in the routine
Next, I guess we’ll go over the arrow_collision routine. All this says is that if the arrow hits a wall, reset it.
arrow_collision: ;arrow collision detection with the walls
LDA Weapons_RAM+4 ;load the arrow’s vertical position, note: the updated position after we’ve moved it
CMP #$08 ;random value for the top wall
BCC .next ;hey, look, our new command
CMP #$E8 ;random value for the bottom wall
BCS .next ;holy shit, there’s the other one
LDA Weapons_RAM+7 ;load the arrow’s horizontal position
CMP #$02 ;random value for the left wall
BCC .next ;again!
CMP #$FE ;random value for the right wall
BCS .next ;wow
JMP .end ;Well, we could change the line above to BCC, but I must have done this for some reason, so we’ll leave it here.
.next
LDA #$FE ;reset the arrows by loading the idle position into the vertical and horizontal positions
STA Weapons_RAM+4
STA Weapons_RAM+7
.end
RTS
If we really didn’t care, we could stop right there, but we want our game to not suck like NGD, so we will make our character pose when he is firing. So, if we input the appropriate information into our subfile for “spritegraphics”, we will be almost set up. So, if the A_timer is not equal to zero, we jump to this routine. Like so:
shooting_graphics:
LDA enemy_direction
CMP #$00
BNE .next
LDY #$60 ;up
JSR enemyspritesupdate
JSR update_enemy_sprites
RTS
.next
CMP #$01
BNE .next1
LDY #$78 ;down
JSR enemyspritesupdate
JSR update_enemy_sprites
RTS
.next1
CMP #$02
BNE .next2
LDY #$68 ;right
JSR enemyspritesupdate
JSR update_enemy_sprites
RTS
.next2
LDY #$70 ;left
JSR enemyspritesupdate
JSR update_enemy_sprites
RTS
You’ll notice that this is pretty much EXACTLY the same as the updates that take place when we move our guy during “handle_input”. Granted, it is a little redundant, but this keeps our routines independent and seperate. Meaning that we can call them in any order, any time. All we are doing is over riding the values set previously. That’s it! Now our guy will shoot arrows and look like he’s having fun doing it!!
SWORD TYPE WEAPONS
Now that we have the PC sprite graphics set up, Swords are easy. They don’t move independent of the main character, so there’s no moving routine to worry about. This works exactly like the arrow loading routine. First we need to just add a quick “skip the routine” if the B_timer is zero and, since the sword doesn’t move, we need to add some sort of routine to move the sprite off screen as the B_timer approches zero. Or:
mace: ;graphics updates for the mace
LDA B_timer
BNE .down
RTS
.down
JSR shooting_graphics ;note that this JSR is very important
LDA B_timer
CMP #$01
BNE .next3
LDA #$FE
STA Weapons_RAM
STA Weapons_RAM+3
RTS
.next3
Simple so far. All we need to do now is load the position and orentation of the sword sprite and we’re done!! Like so:
.next3
LDA enemy_direction ;check the UP direction
CMP #$00
BNE .next
LDA #%00000010 ;update the UP graphics
STA Weapons_RAM+2
LDA #$1C
STA Weapons_RAM+1
LDA sprite_vertical ;save sprite Y position
SEC
SBC #$07
STA Weapons_RAM
LDA sprite_horizontal ;load sprite X position
SEC
SBC #$00
STA Weapons_RAM+3
RTS
.next
Viola!! That’s how it’s done. I believe that is everything in this everything that we’ve added this time. PM or post if you have any questions. Enjoy and we’ll see you next time!